Transitioning: An Encouragement to Future College Students

I recently finished my First semester of College and it’s crazy how fast it flew by! The growth I experienced the past four months is insane and I can’t wait to see what God has in store for me. A year ago I would not have pictured myself being as happy and content as I am today. Here is a little recap of my progression into college as an encouragement to all of those who may be facing anxiety as you anticipate a new transition.

Toward the end of senior year as my friends became increasingly more excited about “heading off to college” and “leaving home”, I became more terrified just at the thought of it. Me, a little 18 year old girl, leaving my family and friends to move three hours away and live with a bunch of girls I didn’t know? I don’t think so! I was very comfortable with life in Riverside, It had been my home the past 13 years and I couldn’t imagine living anywhere else. When people asked me about college I would reply with how any normal 18 year old girl should respond: “I am so excited, I just can’t wait!”. Inside, however, the response was “I am freaking out! I don’t want to go! Please give me another option!”. Through this whole freak out process, something inside me knew that Westmont College was exactly where God wanted me and I couldn’t argue with Him. August 22 approached and I knew it was time to load up the car and begin the scary trek up to college. I literally cried the whole drive up (I know, pretty lame), but what I didn’t realize was that I was in for the most exciting adventure of my life. Lets just say, after the first night I was certain that I was right where God wanted me to be and I was loving every minute of it. The fears I had were all lies and not a single one of them became a reality. I feared that I wouldn’t make any friends- I can probably say that I have 10 best friends. I feared that I would be too dumb for all of my classes- I actually understand what is going on and look forward to class (well, some of the time). And, I feared that running track and field at a collegiate level would wipe me out- track practice is one of the highlights of my day. All this to say, I had all of those stupid fears for no reason. I’m not going to lie, there have been some difficult days and emotional breakdowns, however, college has been the greatest joy in my life thus far and I wouldn’t trade it for the world. God is so faithful and I could not be happier to be exactly where I am at!

Hope this was an encouragement and motivation for you to choose to rely on God’s plan and save yourself the pain of stressing out for no reason, trust me, it will be worth it!

love,

Kat

How I’m Paying for My $20,000/Semester Education

weeknightwhimsies.wordpress.com

I am paying for school on my own.

Let me just start by saying, it’s rough.

But let me also say, it’s possible (if only by God’s grace).

Per semester, the cost of my schooling is over $19,000.

I am currently paying, per semester, just over $7,000. (And working on lowering that too!)

So here are some quick tips–some of which you have heard, some of which you need reminders on,  and some of which will be new.

1. Get good grades in high school. Obvious. But I just had this talk with my freshman in high school brother last night while helping him study for finals: every little decision that he makes right now has the power to effect his college–and therefore job–options in the future. His response? “Stop, you’re scaring me.”

2. Get good grades in high school. Seriously. This knocked off $5,000 a semester for me in grants that I never have to pay back!

3. Apply to scholarships. (Think: the essay ones & the low money ones.) This one is also obvious. I promise we’re getting to some good tricks in a second, this is just something that has come back to bite me. I did not apply to many scholarships in high school, and the ones that I did apply to were always the easy ones (i.e., no essay required) or the ones worth thousands. Think about it: the less money it is, the less people will be applying for them. Also, the more work it is, the less people will be applying for them. Less applicants = More chance for you to win!

****Sidenote to #3: Apply in manageable chunks. Don’t just try to apply to all of the essay ones in a day (unless that works for you–then by all means, do it), but make a schedule and stick to it. Have Christmas break off of school? Pledge to apply for one scholarship a day over your whole break (what I’m currently doing). Or how about one scholarship a weekend during a busier time of year? Either way, make it something that you don’t dread and therefore put off and therefore never get done (can you tell I’m speaking to the high school Jo here?).

****And another sidenote to #3: Still apply for those easy ones. Because hey, who knows? You COULD win that $10,000. Someone does. Just don’t rely on it.

4. Apply for the Parent Plus Loan, even if your parents don’t want to help you pay. Before parents bite my head off here, listen to this. If you have a parent that has bad credit, have them apply for the loan. If they get denied, then you automatically get to accept the loan for yourself. If they get approved, and don’t want it? All they have to do is deny it and it’s erased. I got $2,000 a semester from this one! (though I do have to pay this one back)

5. Get a job. Yeah, self explanatory. But really, you CAN get a job. All it takes is some walking around a shopping center and asking every single manager if they are hiring. You’re bound to get a couple “yes’s”.  Get over the “embarrassment” that it may cause you. (My friend Jill and I did this, and that’s how we got our current job!)

6. Make a budget. Now this one, quite honestly, sucks. We’re young! We want to buy clothes! And go to the movies! And get Starbucks every single day. But then think about it–clothes will last two years, movies will last two hours, and Starbucks will last two minutes. A college education on the other hand, will last a lifetime. It’s about getting your priorities straight–which is honestly something that I am still foolish about and still trying to learn. Factor in the things that  you HAVE to pay for each month: like a $30 cell phone bill (although this one is questionable…do you really need a smart phone? Really?), gas money (to get to your job of course), and tuition. Then, and ONLY THEN, can you really see how much money you have left over to buy said clothes and coffee.

7. And lastly, Talk to your school and, more specifically, your financial aid representative. Set up an appointment and talk to someone face-to-face. Not only will this make it more personal, and therefore make the rep more willing to help you find extra grants lying around, it will also show that you are really dedicated to making your education happen. This is how I found out about the Parent Plus Loan tactic, and now I am setting up another one to see if they have any other ideas to help me out.

Good luck! If you have any other ideas, I’d love to hear them! I always am in need of more ways to help me pay for this spendy but worth it education!

Love, Just Jo

Why I Can’t Think of a Better Title Than, “College Life”

Hey friends! Just Jo here.

So, I’m beginning my tenth week here at college. And while life has been awesome, it has also been crazy.

College has been something completely different than anything I ever expected.

Let’s start from the beginning.

Orientation was exactly like my expectations of college. I expected to be meeting new, awesome people everyday: check. I expected it to be a little awkward with my roommates on our first night: check (or, at least it was for me!). I expected to have a BUNCH of free time: check. Life was going pretty well.

Then classes started.

At first, there was virtually no homework, all of the big tests and projects were way in the future–I had no reason to stress. I was building awesome relationships with so many people, and was constantly doing something fun. It felt like I had all the time in the world to do anything and everything I wanted.

Well, needless to say, that only lasted a little while. Soon enough, those big tests and projects that were “way” in future were right around the corner. Homework started piling up (so. much. reading!). And there was so many options of things to do that I didn’t end up doing anything. Literally, there was one night where I had four different things, all at the same time, that I was planning on going to. But when the time came, and I realized that I could only go to one of them, I was so overwhelmed that I didn’t even go to one.

The rest of these past 10 weeks can be basically summed up like this. The food that I thought wouldn’t got old, got old fast. The people I thought I would be best friends with, changed places with the people that I never thought would be so amazing. Football games are a blast, despite your knowledge–or lack thereof. Your roommates gradually get to know everything about you–even those embarrassing things like that you talk in your sleep and only stink in one armpit (who? me?). And, if you let Him, God will start you on a journey that will leave you forever changed.

It definitely hasn’t been what I expected, but for that, I am grateful. Because God can so far exceed any expectations that I have about anything and everything, why would I want to limit Him to what I think should or will happen?

Have a great week guys!

Motivational Monday #7: Daring, Different, Impractical

mmBe daring. Be different. Be impractical.

Sometimes we get so caught up in living our day to day lives and stressing over them and trying to get all of our work done that we find ourselves at the end of a week (or month or year or decade) having just gone through the motions.

Start your week out right this Monday by having the courage and the purpose to lead a life well-lived. Because no one wants to look back on their years and think, “What was I doing all that time?”.

Fight against those Creatures of Commonplace, and free yourself from the bondage of the ordinary.

Random Musings on Worship

Going to a private Christian college, I am finding myself constantly immersed in Jesus. And while I was honestly expecting to get a little bit tired of it (3 required chapels a week really seems like a lot), it has had the complete opposite effect. I am finding out new aspects of my faith that I never knew existed, or could exist, or that I wanted to exist. I am suddenly more aware of how I worship, how I show my dedication to my Creator, and it’s quite the freeing feeling. 

If there’s anyone else like me, which I’m positive there is (although I could just be weird), singing worship songs is a strange experience because you never really know what to do with your body. Sometimes you feel like you should raise your hands, or close your eyes. Or perhaps you look at people that do such things and find them strange. I have been on both ends of the spectrum, and this journey has led to me a realization. Here is an entry adapted from my journal explaining my thoughts:


So often, I find myself questioning my worshipping techniques. “Should I raise my hands?” “Am I moving my legs too much?” “Is it bad if I don’t raise my hands today?” “Do I have to close my eyes?” These questions are only some of the very ones that ran through my head tonight. But then I realized something: If you have to be asking if you should or should not be doing something in worship, is it truly an act of worship?

Last week, I had a breakthrough moment. I got so caught up in worshipping that I forgot to worry about what I should and should not do, and instead just worshipped, moment by moment, however I felt God calling me to. Who cares that sometimes I sang (loudly and not very prettily, I must add), and sometimes I didn’t. Why does it matter if I raised my hands, brought them down and folded them, then held them out in front of me all within a minute of a single song? 

The point is, it shouldn’t matter if my knees are going crazy bouncing to the music or not, as soon as I let myself go and truly worship, I not only find myself, but, more importantly, I find God.


Hope you’re having a great week.

Love, Just Jo

RAFFLE to Support The One Fund (for the Boston Bombing victims)

Good morning!

I was scrolling through my Facebook wall today and saw this lovely piece of art made by a family friend. She is extremely talented and passionate about her work, and I would love to share her cause with you. Here is what she had to say

“It has been 5 months since the Boston Marathon bombing. While most of us have gone on with our lives, those victims injured in the bombing continue to have ongoing struggles: physically, mentally and financially. As Americans we were ALL affected. I want to do my part to help, but I need your help. I have created this original Fused Glass art piece (18″ x 13″) and mounted on powder coated aluminum. It was inspired by that day, but with the celebration of the human spirit to fight. You can own it! I will be raffling this off on Oct 15. The proceeds will be donated to The One Fund. You can contact me at 951-687-4169 or at oneillsylviaca@gmail.com. 1 ticket $10, 3 tickets $20, 10 tickets $50. I will ship anywhere in US, Canada or Mexico. Please share this with all your friends and help me spread the word.”

Copyright Sylvia O'Neill

Copyright Sylvia O’Niell

Thank you so much for your support in this! Please do not hesitate if you have any questions to call/email her or comment on here and I will do whatever I can to help 🙂

Have a lovely Monday!

Just Jo


How To Keep That Summer Feeling Going: Review on Lush Beach Box

Hello friends!

It’s Jo here. Remember our post about our grad trip to Hawaii? Well, one thing we didn’t mention was that we went to Lush (fresh handmade cosmetics) in Lahaina… 3 times. Lahaina was an hour away from where we stayed, mind you. If you’ve never been to a Lush, then first, you have no idea what you’re missing, but second, you won’t understand why we would want to go to the same store 3 times in a 10 day trip. (I think it was all in the span of 4 days too…)

Lush is, there’s no better way to say this, Heaven on earth. You even walk by, and you can smell it’s wonderfulness. But walking in is like walking into this whole new world. There’s usually 2 or 3 super sweet and super pretty girls (sometimes a guy, but not usually in my experience) that say hello, and instantly one comes up to you to ask if you want to try out some lovely concoction (like a hand scrub and lotion). These concoctions have ALWAYS left me feeling amazing. I suddenly can’t stop rubbing my hands together to feel how soft they are. It’s beautiful.

The problem is, everything is this, if not more, awesome. If you don’t want to spend any money, I suggest leaving your wallet in the car. (But please, make sure you hide it.) They have a huge variety of all-natural, NOT animal tested, completely handmade products (with a picture of the person who made each product and their name on a sticker somewhere on the bottle to prove it). Read: only good for you ingredients all hand mixed together by some lovely person that didn’t harm some cute little bunny out there. Are you getting it yet?

Luckily, the third time we went, I had run out of money (it was towards the end of the trip), so I couldn’t buy anything more. But I would like to tell you all about my experience with the purchases I made on the first two trips. This will be done in a couple posts (because, well, I may have bought quite a few things…).

And while their products aren’t super cheap, they also are actually really well priced for the quality that you are getting.

So, first on my list to review: The Lush Beach Box

Beach BoxThis unfortunately isn’t available anymore as a kit, but everything in it IS still available for full price (which is 100% worth it).

It included…

Sea Vegetable Soap $7.95 for 3.5oz

Dream Cream Body Cream $26.94 for 8.4oz

Ocean Salt Cleanser $21.95 for 4.2oz

Sea Spray Hair mist $12.95 for 3.3oz

Seanik Solid Shampoo $11,95 for 1.9oz

Now okay, in my kit I actually got 3.3oz of Sea Vegetable Soap, 0.5oz of Dream Cream, 2.4oz of Ocean Salt Cleanser, 1.6oz of Sea Spray, and 0.5 of Seanik Solid Shampoo. So keep that in mind when I am talking about how long it lasted me.

First on the list, Sea Vegetable Soap!

Sea Vegetable

This soap is, in one word, amazing. I usually HATE bar soap because it slides all over and I can’t control it. But this stuff has the seaweed on top, which, even though I doubt this was their intention, helps me to get a better grip on it. It doesn’t get overly sudsy, and it leaves you feeling nice, clean, and soft afterwards. And, it smells so good and makes you think you’re on the beach. I am down to my last couple uses with my baby bar, and it’s really depressing actually.

How long have I been using it? Almost 2 months, everyday, and it’s going to last me maybe a weeks more of washes.

Worth the purchase? Well to me, soap is soap. So if you are a soap connoisseur, then I say buy the soap. But if you don’t really care about your soap, you can save a couple bucks.

Second up is the Dream Cream!

Dream Cream

I only got a teeny tiny little tub of this guy, which has made me try to savor it. I have used it a couple times on my legs after shaving, once on my full body, a few times on my hands and elbows, and even once on my face when it was really really dry. And I’m still only halfway through the tub! It spreads on very nicely, so you don’t have to use a lot. It moisturizes like crazy, and keeps you rejuvenated throughout the day. Downfall, the smell isn’t amazing. I mean it’s not gross, just nothing special about it. Also, it leaves you a little bit sticky feeling for a couple minutes after you use it. But that goes away, and then you feel wonderful.

How long have I been using it? Sporadically as listed above. It lasts forever though.

Worth the buy? If you have been looking for a good lotion and have really dry and sensitive skin, I would really recommend this. If your skin already is moisturized, it’s not really necessary.

Next, the Ocean Salt scrub.

Ocean Salt

This scrub is my new favorite thing. I use it once every couple weeks as a face scrub, but because my skin is really sensitive, I put some in my wet hands and rub it around there first to break up some of it’s salt crystals, then I rub it on my face. It is a great exfoliator, but if your skin is crazy overly sensitive like mine, I wouldn’t recommend use any more often than twice a month. However! I rub this on my legs right before I shave, and the exfoliation makes it so I don’t have to shave as often, and the moisturizing properties in it make it so I don’t even have to moisturize after I shave! It’s beautiful.

How long have I been using it? Once or twice a week for two months, half way full still.

Worth the buy? Absolutely. It will change your life.

Almost done! On to the Sea Spray hair mist.

Sea Spray

I have naturally curly hair. But you see, I have this problem with the top layer of my hair–it likes to be stick straight. Literally, my under layers are perfect tiny ringlets and as it goes farther to the top, the blonder and straighter it gets until it’s bleached blonde and perfectly flat. I don’t understand. However, when I go to the beach, my problem is suddenly cured! It’s wonderful (have you noticed how many times I’ve said this, it’s all so great that I’m running out of good adjectives). And this spray has the exact same affect. I actually have tried other beach sprays and have hated them because my hair gets all crunchy. I’ve even tried the pinterest, make your own stuff (which, DO NOT TRY, it was horrible). Nothing has worked. But this stuff smells great (when wearing it, I’ve been asked if I got a new perfume in Hawaii because I smell so lovely and beachy) AND you don’t get a gross crunch. I even sometimes will use it as hairspray on styled hair, and it has the perfect amount of hold. If you can’t tell already, I love it.

How long have I used it? 2 or 3 times per week in the past 2 months, and it’s still 3/4s of the way full! (It only takes 3 or 4 sprays on my hair)

Worth the buy? Yes, Yes, YES.

Annddddd last but not least, the Seanik Solid Shampoo.

Seanik

This was really weird to me. Solid shampoo? What? But this stuff is actually really good at cleaning your hair. The only issue I have is that it leaves my hair a little dry feeling, and since I have crap conditioner right now, it’s a bit of a struggle. Curly hair is already naturally dry, so the fact that this takes away extra oils from your head makes it not the best option for my hair. But it smells wonderful, it lasts ages, and it does it’s job–cleans your hair. Even if I am disgustingly greasy it takes it all away. How do you use solid shampoo, you ask? Well you get your hands wet, rub it around in your hands until you get plenty of the product on them, and then rub it into  your scalp. See, now that wasn’t so hard.

How long have I used it? Every day for the past 2 months. There’s still probably enough for the next 2 months. Like I said, you really don’t use a ton of the product.

Worth the buy? If you have a naturally oily scalp, I would HIGHLY recommend it. If you have a problem with already dry hair, it could still be a smart buy for those times when you haven’t showered in a couple days or have worked out a lot.

Overall, I am really happy with my Beach Box, and will definitely be re-buying the majority of the products in it once I run out.

Let me know if you bought one, and how you’ve felt about the products! We always love hearing from you. Keep that summer going!

With love, Just Jo

How to Make Your Own Lace and Jean Shorts

Hello friends!

I (Kat) recently spent a day in LA and happened upon an awesome little fabric shop where I purchased some adorable lace! We of course had to use it in a way fitting to its beauty, so why not jump in on the lacey shorts trend? Below is our experience of making these fun little pieces, be sure to check out all three pairs!

Enjoy your craft time!

Love,

Kat and Jo

KATS PAIR #1: Peep-out Lace

DSCF0980

I first had to cut some old shorts to the desired length. Remember that the lace will add an inch or two in length so plan accordingly. I used a hair straightner to flatten out the edges–I’m sure an iron would work too 🙂

DSCF0981

DSCF0982

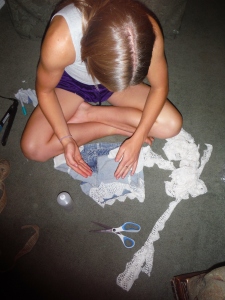
Our supplies: Home-cut shorts, lace, and fabric glue

DSCF0983

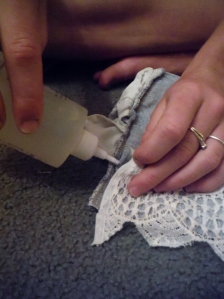
I was going for the lace peeping out the bottom look, so be sure to turn your shorts inside out if this is what you too are aspiring to. Then place fabric glue around the edges, if not all under where the lace is touching. It tends to get annoyingly sticky, so be patient.

DSCF0989

View from above.

DSCF0991

Halfway done! Note the pocket sticking out on my left hand side. If you run into this problem, you can either cut the pocket out (like I did), just don’t forget and put valuables in it!, or fold the pocket up a bit and glue it.

DSCF0997

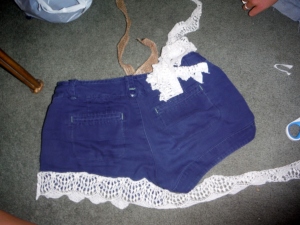
I added lace to the back pockets just to spice things up a bit.

DSCF0992

The finished product!

KAT’S PAIR #2: Half Laced

get-attachment.aspx

I made these the same way, I don’t have a picture tutorial for you, but I figures it was pretty easy to figure out, just cut, lace and glue. 🙂

get-attachment-1.aspx

you can dress them up or dress them down, I absolutely love them!

JO’S PAIR: Bold Bows

DSCF0985

These were just a basic pair of Target shorts that are super old and had actually began to break earlier that day, so I figured, why not reconstruct them a bit! I settled on showing the full lace on the outside of my shorts. Again, AT LEAST glue the edges. Also, if you are opting for this version, it is a little bit more time consuming because you have to make sure to keep the lace straight.

DSCF0988

The shorts were naturally split on the outside edges, so I stopped the lace on the outside of the seam. However, looking back, I would have added a little bit of lace around the corner, just to make it flow better.

DSCF0990

Halfway done!

DSCF0993

Once the lace was glued down all the way around the bottoms, I glued some lace onto the pockets, to make into bows, shown in the next picture.

DSCF0995

Glue down the edges ONLY, then take a small strip of lace and tie it around the middle of the pocket lace, creating a bow effect.

DSCF0998

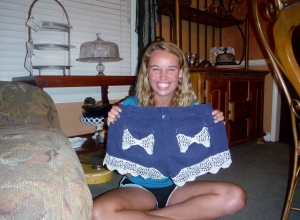
Finished product!

DSCF1001

You’ll note that in this picture, Jo’s shorts have lace coming out of the front pockets as well. These were a later addition since the front was a little overpowered by the dark blue and the light lace looked funky. To do this, I just glued lace on the inside of the pockets, and then folded it over and glued that down too.

   DSCF1006

Flower Crowns: Our Newest Love

Hello Whimsical Friends!

Remember the days when you were about 7 years old and longed for a prince of your own to gallop up on his bright white horse and sweep you off your feet? Well, we do (and we may or may not still be in that state of mind…). Sometimes you just need to go back to that innocent little girl mindset and allow yourself to dream a little dream.

With that said, we are absolutely in LOVE with flower crowns. They are like going to Disneyland and wearing a princess dress and crown, yet without the $100 ticket and heavy dress. Basically, they are magical–they transport you to a time of innocence and hope. But, like so many others, we assumed that they would be difficult to make, and almost gave up on them before even trying! But alas! We were proven wrong. Below, we document our 3 different variations on how we mastered the trend.

Have a wondrous time being a Pretty Pretty Princess!

Kat and Jo

Option A: Use string to hold the flowers together. This is the sturdiest version. I used pink string because it was my first time and it was all that we had, so if you choose to do this way, probably try to find something green. Pick several flowers (keeping as long a stem as possible) and several green-leafy things. I’m not really a flower person so I couldn’t tell you the name of the plants that I used, but you get the idea. I layered 3 stems together with varying lengths and tied them together. Then I did this again with three more, then added the second three to the first three by tying that as well. Repeat this process until you have a line of flowers long enough to fit around your head. NOTE: In my experience, flower crowns look better when they sit on your forehead and go all the way around your head. I did not know this at this point, so you’ll notice that this crown is sitting on top of my head. Don’t do this 🙂

flower crown option one

Option B: Weave the stems together. This is the least sturdy flower crown option, once you take it off, you will NOT be able to put it back on. When taking my senior pictures, I really wanted to have a flower crown. I didn’t exactly come prepared with string, so we ended up just taking the stems and twisting them around each other. For this to work, the stems must be very pliable. If they are sturdy in the least bit, they will not stay twisted, but return to their usual straight position.

Option B

IMG_1639By the way, these pictures were taken by Dawn Malone of Dawn Malone Photography, which you can find here. Isn’t she awesome?

Option C: Braid a reed and stick flowers into it. This is also a very sturdy option, but the difficult part is, not everyone has reeds. However, Kat has an awesome backyard, so we got to use them! Split the reed in 3 (this is sometimes hard to do, don’t give up), and braid like normal. It doesn’t need to necessarily be tight, but you don’t want it to be a loose braid that will let the flowers drop out.

get-attachment-1.aspxget-attachment-6.aspxBraid until it is long enough to fit around your head, and it is really helpful to have a friend tie it in the back for you.get-attachment-8.aspxPick some flowers (the more, the better)–this is easy when you have a backyard literally FILLED with all different colors and sizes.get-attachment-9.aspxWeave the stems into the braid (these stems don’t need to be super long, but make sure you still have weaving room), until you are satisfied with how filled it is.get-attachment-2.aspxget-attachment-5.aspxThen, very carefully, place on your head. We were actually able to take these off once or twice and put them back on with only a few flowers falling out (which were very easily replaced).

get-attachment-4.aspxAnd then, in true Weeknight Whimsies fashion, you must go get dressed super cute and take fun pictures.

ww flower crowns

IMG954556Feel like a Princess yet?